Android App Development With AndroidCource: 2018

Thursday 29 November 2018

Google Maps in android example

Google Maps in Android

Android provide to integrate google maps in android Application.You can show any location on the map And show different routes on the map.Android Google Maps v1 API is deprecated now it can integrate Google Maps v2 API in your android application.google map application to customization in google maps.

google maps android tutorial

Google provides via Google play a library for using Google Maps in your application.

google apis for android

Google provides provide in google map api in V2 use.It's better than Google Maps Api V2 instead of V1, because no new features will be added to Google Maps Android API v1.

google map maker android

You Can Add Custom Maker in android. And Add Multiple Maker in google maps api in android. set customize location on google map

google maps sdk integration in android

Step 1 : First Goto https://console.cloud.google.com/ And Then Login Your Gmail

Step 2 : And Then Open Dashboard To Left Side Navigation bar show.Now You can Select 
              APIs & Libraries  here.And Then Open Next Screen And Select Enables API And Services.
Google Maps Api Key Enable

Step 3 : Next Select Maps Sdk For Androi.


Step 4 : Click To Enable Button


Step 5 : Click Top Button on SelectProject And Open PopupBox To TopRight Create New 
Project.


Step 6 : Then Created Project To Select Same Top Center Box Open Select A Project And Selected Project You Want To Created.

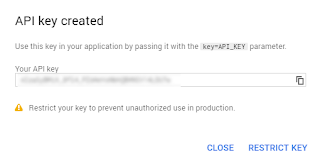
Step 7 : Now Go To Credentials Tab And Create Credentials Open Menu To Select ApiKey 
And Open Key PopupBox To Copy And Click To RESTRICK Key..Now Open Screen To 
Add Your Package Name And SHA Key And Select Android Apps And Click To Save Button.


Api Key In Google Maps Android

Step 8 : Create/Select  GoogleMapsActivity In Android 


Step 9 : Add Dependancy App Module build.gradle File


implementation 'com.google.android.gms:play-services-maps:15.0.1'

Step 10 : Add Permission And GoogleMap Key Add In AndroidManifest.xml File
<?xml version="1.0" encoding="utf-8"?>
<manifest xmlns:android="http://schemas.android.com/apk/res/android"
    package="com.example.bhaumik.googlemapsdemo">
    <!--
         The ACCESS_COARSE/FINE_LOCATION permissions are not required to use
         Google Maps Android API v2, but you must specify either coarse or fine
         location permissions for the 'MyLocation' functionality. 
    -->
    <uses-permission android:name="android.permission.ACCESS_FINE_LOCATION" />

    <application
        android:allowBackup="true"
        android:icon="@mipmap/ic_launcher"
        android:label="@string/app_name"
        android:roundIcon="@mipmap/ic_launcher_round"
        android:supportsRtl="true"
        android:theme="@style/AppTheme">
        <!--
             The API key for Google Maps-based APIs is defined as a string resource.
             (See the file "res/values/google_maps_api.xml").
             Note that the API key is linked to the encryption key used to sign the APK.
             You need a different API key for each encryption key, including the release key that is used to
             sign the APK for publishing.
             You can define the keys for the debug and release targets in src/debug/ and src/release/. 
        -->
        <meta-data
            android:name="com.google.android.geo.API_KEY"
            android:value="@string/google_maps_key" />

        <activity
            android:name=".MapsActivity"
            android:label="@string/title_activity_maps">
            <intent-filter>
                <action android:name="android.intent.action.MAIN" />

                <category android:name="android.intent.category.LAUNCHER" />
            </intent-filter>
        </activity>
    </application>

</manifest>
Step 11 : Add MapsActivity.xml File Design
<?xml version="1.0" encoding="utf-8"?>
<fragment xmlns:android="http://schemas.android.com/apk/res/android"
    xmlns:map="http://schemas.android.com/apk/res-auto"
    xmlns:tools="http://schemas.android.com/tools"
    android:id="@+id/map"
    android:name="com.google.android.gms.maps.SupportMapFragment"
    android:layout_width="match_parent"
    android:layout_height="match_parent"
    tools:context=".MapsActivity" />
Step 12 : MapsActivity.java File
package com.example.bhaumik.googlemapsdemo;

import android.support.v4.app.FragmentActivity;
import android.os.Bundle;

import com.google.android.gms.maps.CameraUpdateFactory;
import com.google.android.gms.maps.GoogleMap;
import com.google.android.gms.maps.OnMapReadyCallback;
import com.google.android.gms.maps.SupportMapFragment;
import com.google.android.gms.maps.model.LatLng;
import com.google.android.gms.maps.model.MarkerOptions;

public class MapsActivity extends FragmentActivity implements OnMapReadyCallback {

    private GoogleMap mMap;

    @Override
    protected void onCreate(Bundle savedInstanceState) {
        super.onCreate(savedInstanceState);
        setContentView(R.layout.activity_maps);
        // Obtain the SupportMapFragment and get notified when the map is ready to be used.
        SupportMapFragment mapFragment = (SupportMapFragment) getSupportFragmentManager()
                .findFragmentById(R.id.map);
        mapFragment.getMapAsync(this);
    }


    /**
     * Manipulates the map once available.
     * This callback is triggered when the map is ready to be used.
     * This is where we can add markers or lines, add listeners or move the camera. In this case,
     * we just add a marker near Sydney, Australia.
     * If Google Play services is not installed on the device, the user will be prompted to install
     * it inside the SupportMapFragment. This method will only be triggered once the user has
     * installed Google Play services and returned to the app.
     */
    @Override
    public void onMapReady(GoogleMap googleMap) {
        mMap = googleMap;

        // Add a marker in Sydney and move the camera
        LatLng sydney = new LatLng(-34, 151);
        mMap.addMarker(new MarkerOptions().position(sydney).title("Marker in Sydney"));
        mMap.moveCamera(CameraUpdateFactory.newLatLng(sydney));
    }
}
Step 13 : Now You Can Run And Test Show On Google Maps.

Wednesday 28 November 2018

Remind Task Application

Remind Task application is use to Remind your daily schedule and Your Daily work timing.remind task is create your task details and date timing of schedule task. And then perticular task datetime to send notificaion to aleart and remind your task.
And you are Not task completed in your task time you can Edit task and New datetime set and Notify to Newdatetime Set.Now Your task is Completed To Perticular Date Time Then You can Long Press To Delete Task. Now You Can Set multiple Task Schedule..


                        Download This App Link

                          Click To Download App


Thursday 12 July 2018

Gridview in Android Example

What is GridView ?


GridView layout is a use to show data in grid layout.GridView is a ViewGroup that displays items in a two-dimensional, scrollable grid.In this layout is show row and column item in gridview.Gridview is use to BaseAdapter.GridView is a ViewGroup that displays items in a two-dimensional, scrollable grid. GridView is mainly useful when we want show data in grid layout like displaying images or icons.This layout can be used to build applications like image viewer, audio or video players in order to show elements in grid view.


MainActivity.xml


<?xml version="1.0" encoding="utf-8"?>
<RelativeLayout xmlns:android="http://schemas.android.com/apk/res/android"
    xmlns:app="http://schemas.android.com/apk/res-auto"
    xmlns:tools="http://schemas.android.com/tools"
    android:layout_width="match_parent"
    android:layout_height="match_parent"
    tools:context=".MainActivity">

    <GridView xmlns:android="http://schemas.android.com/apk/res/android"
        android:id="@+id/grid_view"
        android:layout_width="fill_parent"
        android:layout_height="fill_parent"
        android:numColumns="auto_fit"
        android:columnWidth="90dp"
        android:horizontalSpacing="10dp"
        android:verticalSpacing="10dp"
        android:gravity="center"
        android:stretchMode="columnWidth" >

    </GridView>

</RelativeLayout>

What is BaseAdapter ?


Base Adapter. Adapter is a bridge between UI and data source, It helps us to fill data in the UI components.Common base class of common implementation for an Adapter that can be used in both ListView (by implementing the specialized ListAdapter interface) and Spinner (by implementing the specialized SpinnerAdapter interface).


MyAdapter.java


package com.example.bhaumik.gridviewdemo;

import android.content.Context;
import android.view.View;
import android.view.ViewGroup;
import android.widget.BaseAdapter;
import android.widget.GridView;
import android.widget.ImageView;

public class MyAdapter extends BaseAdapter{

    Context mContext;

    int img[] = {R.drawable.img_1,R.drawable.img_2,R.drawable.img_3,R.drawable.img_4,R.drawable.img_5,R.drawable.img_6,R.drawable.img_7};

    public MyAdapter(Context mContext) {
        this.mContext = mContext;
    }

    @Override
    public int getCount() {
        return img.length;
    }

    @Override
    public Object getItem(int i) {
        return img[i];
    }

    @Override
    public long getItemId(int i) {
        return 0;
    }

    @Override
    public View getView(int position, View convertView, ViewGroup parent) {
        ImageView imageView = new ImageView(mContext);
        imageView.setImageResource(img[position]);
        imageView.setScaleType(ImageView.ScaleType.CENTER_CROP);

        return imageView;
    }
}

MainActivity.java


package com.example.bhaumik.gridviewdemo;

import android.support.v7.app.AppCompatActivity;
import android.os.Bundle;
import android.widget.GridView;

public class MainActivity extends AppCompatActivity {

    GridView gridView;

    @Override
    protected void onCreate(Bundle savedInstanceState) {
        super.onCreate(savedInstanceState);
        setContentView(R.layout.activity_main);

        gridView = findViewById(R.id.grid_view);

        gridView.setAdapter(new MyAdapter(MainActivity.this));

    }
}


Saturday 7 July 2018

Expandable Listview in Android Example

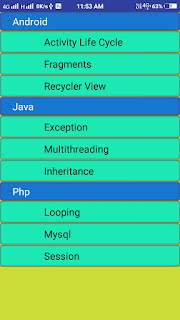
Android, ExpandableListView is a View that shows items in a vertically scrolling two level list. Different from the listview by allowing two level groups which can individually be expanded to show.Expandable listview is a parent and childview to expand to click parent view to display childview in android.

MainActivity.xml

<?xml version="1.0" encoding="utf-8"?>
<RelativeLayout xmlns:android="http://schemas.android.com/apk/res/android"
    xmlns:tools="http://schemas.android.com/tools"
    android:id="@+id/activity_main"
    android:layout_width="match_parent"
    android:layout_height="match_parent"
    tools:context="com.bhaumik.expandablelistwithactivity.MainActivity"
    android:background="@color/MainActivityBackground">


    <ExpandableListView
        android:layout_width="match_parent"
        android:layout_height="match_parent"
        android:id="@+id/expand_view" />

</RelativeLayout>
Create XML File to Parent Item Display in Layout

PrentItem.xml

<?xml version="1.0" encoding="utf-8"?>
<LinearLayout xmlns:android="http://schemas.android.com/apk/res/android"
    android:orientation="vertical" android:layout_width="match_parent"
    android:layout_height="match_parent"
    android:background="@drawable/parent_item_bg">

    <TextView
        android:id="@+id/tv_parent_item"
        android:layout_width="wrap_content"
        android:layout_height="wrap_content"
        android:textColor="@color/WhiteColor"
        android:text="Parent Item"
        android:textSize="20dp"
        android:padding="5dp"
        android:layout_marginLeft="20dp"/>
</LinearLayout>
Create XML Layout file to Child Item in Listview

ChildItem.xml

<?xml version="1.0" encoding="utf-8"?>
<LinearLayout xmlns:android="http://schemas.android.com/apk/res/android"
    android:orientation="vertical" android:layout_width="match_parent"
    android:layout_height="match_parent"
    android:background="@drawable/child_item_bg">
    <TextView
        android:id="@+id/tv_child_item"
        android:layout_width="match_parent"
        android:layout_height="match_parent"
        android:textColor="@color/BlackColor"
        android:text="Child Item"
        android:textSize="20dp"
        android:padding="8dp"
        android:layout_marginLeft="80dp"/>
</LinearLayout>

MainActivity.java

package com.bhaumik.expandablelistwithactivity;

import android.content.Intent;
import android.media.MediaPlayer;
import android.support.design.widget.TabLayout;
import android.support.v4.app.FragmentActivity;
import android.support.v4.view.ViewPager;
import android.support.v7.app.AppCompatActivity;
import android.os.Bundle;
import android.support.v7.widget.Toolbar;
import android.transition.Explode;
import android.view.View;
import android.widget.ExpandableListView;
import android.widget.Toast;

import java.util.ArrayList;
import java.util.HashMap;
import java.util.List;
import java.util.jar.Manifest;

public class MainActivity extends FragmentActivity {

    ExpandableListView expandableListView;

    List<String> main_title = new ArrayList<>();
    List<String> android_list = new ArrayList<>();
    List<String> java_list = new ArrayList<>();
    List<String> php_list = new ArrayList<>();
    HashMap<String,List<String>> child_list = new HashMap<String,List<String>>();

    @Override
    protected void onCreate(Bundle savedInstanceState) {
        super.onCreate(savedInstanceState);
        setContentView(R.layout.activity_main);

        expandableListView = (ExpandableListView) findViewById(R.id.expand_view);

        String[] cource_title = getResources().getStringArray(R.array.cource_title);
        String[] android_items = getResources().getStringArray(R.array.android_item);
        String[] java_items = getResources().getStringArray(R.array.java_item);
        String[] php_items = getResources().getStringArray(R.array.php_item);

        for(String heading : cource_title)
        {
            main_title.add(heading);
        }
        for (String android : android_items)
        {
            android_list.add(android);
        }
        for (String java : java_items)
        {
            java_list.add(java);
        }
        for (String php : php_items)
        {
            php_list.add(php);
        }

        child_list.put(main_title.get(0),android_list);
        child_list.put(main_title.get(1),java_list);
        child_list.put(main_title.get(2),php_list);

        final MyAdapter myAdapter = new MyAdapter(MainActivity.this,main_title,child_list);
        expandableListView.setAdapter(myAdapter);

    }
}
Create Adapter to set Parent And Child item Data in listview.

MyAdapter.java

package com.bhaumik.expandablelistwithactivity;

import android.content.Context;
import android.content.Intent;
import android.view.LayoutInflater;
import android.view.View;
import android.view.ViewGroup;
import android.widget.BaseExpandableListAdapter;
import android.widget.TextView;

import java.util.HashMap;
import java.util.List;

/**
 * Created by Bhaumik on 3/23/2017.
 */

public class MyAdapter extends BaseExpandableListAdapter{

    Context context;
    List<String> cource_title;
    HashMap<String,List<String>> child_title;

    public MyAdapter(Context context, List<String> cource_title, HashMap<String, List<String>> child_title) {
        this.context = context;
        this.cource_title = cource_title;
        this.child_title = child_title;
    }

    @Override
    public int getGroupCount() {
        return cource_title.size();
    }

    @Override
    public int getChildrenCount(int groupPosition) {
        return child_title.get(cource_title.get(groupPosition)).size();
    }

    @Override
    public Object getGroup(int groupPosition) {
        return cource_title.get(groupPosition);
    }

    @Override
    public Object getChild(int groupPosition, int childPosition) {
        return child_title.get(cource_title.get(groupPosition)).get(childPosition);
    }

    @Override
    public long getGroupId(int groupPosition) {
        return groupPosition;
    }

    @Override
    public long getChildId(int groupPosition, int childPosition) {
        return childPosition;
    }

    @Override
    public boolean hasStableIds() {
        return false;
    }

    @Override
    public View getGroupView(int groupPosition, boolean isExpanded, View convertView, ViewGroup parent) {

        String titles = (String) this.getGroup(groupPosition);

        if(convertView == null)
        {
            LayoutInflater layoutInflater = (LayoutInflater) context.getSystemService(context.LAYOUT_INFLATER_SERVICE);
            convertView = layoutInflater.inflate(R.layout.parent_item,null);
        }
        TextView textView = (TextView) convertView.findViewById(R.id.tv_parent_item);
        textView.setText(titles);

        return convertView;
    }

    @Override
    public View getChildView(final int groupPosition, final int childPosition, boolean isLastChild, View convertView, ViewGroup parent) {

        String titles = (String) this.getChild(groupPosition,childPosition);

        if(convertView == null)
        {
            LayoutInflater layoutInflater = (LayoutInflater) context.getSystemService(context.LAYOUT_INFLATER_SERVICE);
            convertView = layoutInflater.inflate(R.layout.child_item,null);
        }
        TextView textView = (TextView) convertView.findViewById(R.id.tv_child_item);
        textView.setText(titles);

        textView.setOnClickListener(new View.OnClickListener() {
            @Override
            public void onClick(View v) {
                Intent intent = new Intent(context,DetailActivity.class);
                intent.putExtra("text",child_title.get(cource_title.get(groupPosition)).get(childPosition));
                context.startActivity(intent);
            }
        });
        return convertView;
    }

    @Override
    public boolean isChildSelectable(int groupPosition, int childPosition) {
        return true;
    }
}
expandable listview in android expandable listview in android

Recyclerview with Searchview Actionbar in Android Example

Recyclerview with searchview in actionbar to add searchview to you can search in item from recyclerview list.it is use to two methods are override to onQueryTextSubmit And onQueryTextChange

onQueryTextSubmit

In this method to use of you can input searchview and click to search item when you can searchable word.but it can first input type to search item and then click button after searchable item show.

onQueryTextChange

In this method to use of at a time to input word to search result show on at a time. ane refresh adapter to at a time and display search item in this method.

Add Depedancy AndroidManifest.xml File

    implementation 'com.android.support:recyclerview-v7:28.0.0-alpha3'

Add Menu Resource File Use to Searchview main_menu.xml

<?xml version="1.0" encoding="utf-8"?>
<menu xmlns:app="http://schemas.android.com/apk/res-auto"
    xmlns:android="http://schemas.android.com/apk/res/android">


    <item
        android:id="@+id/app_bar_search"
        android:icon="@drawable/ic_search_black_24dp"
        android:title="Search"
        app:showAsAction="always |collapseActionView"
        app:actionViewClass="android.support.v7.widget.SearchView" />
</menu>

Add Custom Layout File to Use Set Adapter in Recyclerview item_row.xml

<?xml version="1.0" encoding="utf-8"?>
<LinearLayout xmlns:android="http://schemas.android.com/apk/res/android"
    android:orientation="vertical" android:layout_width="match_parent"
    android:layout_height="wrap_content"
    android:layout_margin="5dp">

    <LinearLayout
        android:layout_width="match_parent"
        android:layout_height="wrap_content"
        android:orientation="horizontal">

        <ImageView
            android:layout_width="100dp"
            android:layout_height="100dp"
            android:id="@+id/img_view"/>

        <TextView
            android:layout_width="wrap_content"
            android:layout_height="wrap_content"
            android:layout_marginLeft="10dp"
            android:layout_gravity="center"
            android:textSize="20dp"
            android:id="@+id/text_view"/>

    </LinearLayout>

    <View
        android:layout_width="match_parent"
        android:layout_height="1dp"
        android:background="#000000" />

</LinearLayout>

MainActivity.xml

<?xml version="1.0" encoding="utf-8"?>
<LinearLayout xmlns:android="http://schemas.android.com/apk/res/android"
    xmlns:app="http://schemas.android.com/apk/res-auto"
    xmlns:tools="http://schemas.android.com/tools"
    android:layout_width="match_parent"
    android:layout_height="match_parent"
    tools:context=".MainActivity">

    <android.support.v7.widget.RecyclerView
        android:layout_width="match_parent"
        android:layout_height="match_parent"
        android:id="@+id/recycler_view"/>

</LinearLayout>

Create Getter Setter Method Class to use this set and get data in list item. FruitsData.java

package com.example.bhaumik.recyclerviewdemo;

public class FruitsData {

    public String name;
    public int image;

    public FruitsData(String name, int image) {
        this.name = name;
        this.image = image;
    }

    public String getName() {
        return name;
    }

    public void setName(String name) {
        this.name = name;
    }

    public int getImage() {
        return image;
    }

    public void setImage(int image) {
        this.image = image;
    }
}

MainActivity.java

package com.example.bhaumik.recyclerviewdemo;

import android.support.v4.view.MenuItemCompat;
import android.support.v7.app.AppCompatActivity;
import android.os.Bundle;
import android.support.v7.widget.LinearLayoutManager;
import android.support.v7.widget.RecyclerView;
import android.support.v7.widget.SearchView;
import android.view.Menu;
import android.view.MenuItem;

import java.util.ArrayList;
import java.util.List;

public class MainActivity extends AppCompatActivity {

    RecyclerView recyclerView;
    MyAdapter myAdapter;
    List<FruitsData> list = new ArrayList<>();
    @Override
    protected void onCreate(Bundle savedInstanceState) {
        super.onCreate(savedInstanceState);
        setContentView(R.layout.activity_main);

        list.add(new FruitsData("Apple",R.drawable.apple));
        list.add(new FruitsData("Banana",R.drawable.banana));
        list.add(new FruitsData("Grapes",R.drawable.grapes));
        list.add(new FruitsData("JackFruit",R.drawable.jack_fruit));
        list.add(new FruitsData("Lemon",R.drawable.lemon));
        list.add(new FruitsData("Mango",R.drawable.mango));
        list.add(new FruitsData("Orange",R.drawable.orange));
        list.add(new FruitsData("Papaya",R.drawable.papaya));
        list.add(new FruitsData("pear",R.drawable.pear));
        list.add(new FruitsData("Pineapple",R.drawable.pine_apple));

        recyclerView = findViewById(R.id.recycler_view);

        recyclerView.setLayoutManager(new LinearLayoutManager(this));

        myAdapter = new MyAdapter(MainActivity.this,list);
        recyclerView.setAdapter(myAdapter);

    }

    @Override
    public boolean onCreateOptionsMenu(Menu menu) {

        getMenuInflater().inflate(R.menu.main_menu,menu);
        MenuItem menuItem = menu.findItem(R.id.app_bar_search);
        SearchView searchView = (SearchView) MenuItemCompat.getActionView(menuItem);
        searchView.setOnQueryTextListener(new SearchView.OnQueryTextListener() {
            @Override
            public boolean onQueryTextSubmit(String query) {


                return true;
            }

            @Override
            public boolean onQueryTextChange(String newText) {

                if (myAdapter != null){
                    myAdapter.getFilter().filter(newText);
                }

                return true;
            }
        });
        return true;
    }

}

Create Adapter to Set Data in recyclerview MyAdapter.java

package com.example.bhaumik.recyclerviewdemo;

import android.content.Context;
import android.support.annotation.NonNull;
import android.support.v7.widget.RecyclerView;
import android.view.LayoutInflater;
import android.view.View;
import android.view.ViewGroup;
import android.widget.Filter;
import android.widget.Filterable;
import android.widget.ImageView;
import android.widget.TextView;

import java.util.ArrayList;
import java.util.List;

public class MyAdapter extends RecyclerView.Adapter<MyAdapter.MyHolder>  implements Filterable {

    Context context;
    List<FruitsData> list = new ArrayList<>();
    List<FruitsData> list1 = new ArrayList<>();

    public MyAdapter(Context context, List<FruitsData> list) {
        this.context = context;
        this.list = list;
        this.list1 = list;
    }

    @NonNull
    @Override
    public MyHolder onCreateViewHolder(@NonNull ViewGroup viewGroup, int i) {

        View view = LayoutInflater.from(context).inflate(R.layout.item_list,viewGroup,false);

        return new MyHolder(view);
    }

    @Override
    public void onBindViewHolder(@NonNull MyHolder myHolder, int i) {

        myHolder.imageView.setImageResource(list.get(i).getImage());
        myHolder.textView.setText(list.get(i).getName());

    }

    @Override
    public int getItemCount() {
        return list.size();
    }

    public static class MyHolder extends RecyclerView.ViewHolder{

        ImageView imageView;
        TextView textView;

        public MyHolder(@NonNull View itemView) {
            super(itemView);

            imageView = itemView.findViewById(R.id.img_view);
            textView = itemView.findViewById(R.id.text_view);

        }
    }

    @Override
    public Filter getFilter() {
        return new Filter() {
            @Override
            protected FilterResults performFiltering(CharSequence constraint) {

                String charString = constraint.toString();

                if (charString.isEmpty()){
                    list = list1;
                }else{

                    List<FruitsData> filterList = new ArrayList<>();

                    for (FruitsData data : list1){

                        if (data.getName().toLowerCase().contains(charString)){
                            filterList.add(data);
                        }
                    }

                    list = filterList;

                }

                FilterResults filterResults = new FilterResults();
                filterResults.values = list;

                return filterResults;
            }

            @Override
            protected void publishResults(CharSequence constraint, FilterResults results) {

                list = (List<FruitsData>) results.values;
                notifyDataSetChanged();
            }
        };

    }
}
recyclerview in androidrecyclerview searchview in android